
Introduction
The Aptos universe is calling! This blazing-fast blockchain is a whirlwind of creativity and efficiency, empowering a whole new generation of decentralized applications. Whether you want to stake APT tokens and reap the rewards, dive into the vibrant NFT marketplace, or dance to the rhythm of DeFi, this guide is your golden ticket. Let’s embark on this Aptos adventure together!
Before we dive in, let’s start with a few questions to get you thinking:
- Have you ever wondered how blockchain smart contracts work?
- Are you curious about what makes Move different from other smart contract languages?
- Do you want to build your own decentralized applications on the Aptos blockchain?
If you answered yes to any of these questions, then this tutorial is for you. Let’s get started!
What is Aptos?

Aptos is a high-performance blockchain platform designed to bring scalability, security, and reliability to decentralized applications. It leverages a novel consensus mechanism and a new smart contract programming language called Move. Aptos aims to solve the issues of existing blockchain platforms by providing a highly performant and secure environment for developers.
Key Features of Aptos
- High Throughput: Aptos uses a pipelined and parallelized approach to handle a large number of transactions per second.
- Security: Built with safety in mind, the Move language provides strong guarantees around resource management and type safety.
- Modularity: The modular design of the Aptos blockchain allows for easier upgrades and maintenance.
Aptos Consensus Mechanism
Aptos utilizes a consensus mechanism known as Byzantine Fault Tolerance (BFT). This approach ensures that the network can reach consensus even if some of the nodes are malicious or faulty. The AptosBFT consensus protocol is designed to be both efficient and resilient, providing high throughput and low latency.
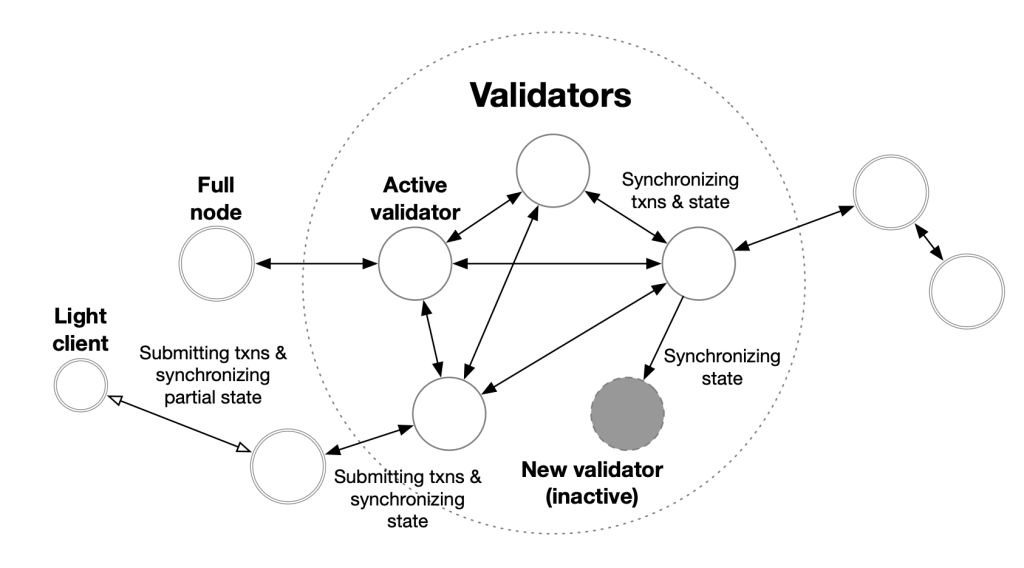
Aptos Network Structure
The Aptos network consists of multiple nodes that work together to validate transactions and maintain the blockchain. Each node participates in the consensus process, contributing to the overall security and decentralization of the network. The network is designed to be scalable, allowing it to support a large number of nodes without compromising performance.

The Aptos Team
The Aptos team is led by co-founders Mo Shaikh (Linkedin & Twitter) and Avery Ching (Linkedin & Twitter), both of whom were previously involved in Meta’s (formerly Facebook) blockchain projects, Diem and Novi. They bring significant expertise and experience to the Aptos project. According to Aptos Labs, the team comprises accomplished engineers, researchers, strategists, designers, and builders committed to delivering universal and equitable access to decentralization.

Aptos Vision

According to the whitepaper, the vision for Aptos is to bring fair access to decentralization for all. The blockchain aims to achieve this through a safe, upgradeable, and scalable network. The Aptos Foundation focuses on the network’s growth, while Aptos Labs is dedicated to developing products and applications on the Aptos blockchain. The name “Aptos” itself means “the people” in the Ohlone language, reflecting the project’s inclusive mission.
What is Move?

Move is a new programming language developed for the Aptos blockchain. It is designed to provide a safe and flexible foundation for smart contracts and digital assets. Move’s type system and resource model ensure that assets cannot be duplicated or lost, providing strong guarantees for the correctness of transactions.
Key Features of Move
- Resource-Oriented Programming: Move treats digital assets as resources, ensuring they are managed correctly and cannot be copied or discarded accidentally.
- Type Safety: The type system in Move prevents many common programming errors, enhancing security.
- Modularity: Move modules allow for reusable and composable code, making development more efficient.
Why Choose Move?
Move offers several advantages over traditional smart contract languages like Solidity:
- Safety and Security: Move’s resource model ensures that assets are used correctly, preventing common bugs and vulnerabilities.
- Efficiency: Move’s design allows for efficient execution of transactions, supporting high throughput on the Aptos blockchain.
- Flexibility: Move’s modularity and type system enable developers to build complex applications with ease.
Step-by-Step Guide to Mastering Aptos Smart Contracts
Setting Up Your Development Environment

Before we start coding, let’s set up our development environment. You will need the following tools:
- Rust: Move is written in Rust, so you will need to have Rust installed. You can download it from rust-lang.org.
curl --proto '=https' --tlsv1.2 -sSf https://sh.rustup.rs | sh- Move CLI: The Move command-line interface (CLI) helps in compiling, testing, and deploying Move programs. You can install it using the following command:
cargo install --git https://github.com/aptos-labs/aptos-core.git move-cli --branch mainAfter installing Rust and the Move CLI, you can verify the installation by running:
move --versionWriting Your First Move Module
Now that our environment is set up, let’s write our first Move module. A module in Move is similar to a class in object-oriented programming. It contains functions and resources that can be used to interact with the blockchain.
Create a new file named HelloMove.move and add the following code:
module 0x1::HelloMove {
    public fun hello(): vector<u8> {
        b"Hello, Move!"
    }
}- Module Declaration: The
module 0x1::HelloMovedeclaration defines a new module namedHelloMove. In Move, a module is a collection of related functions and data types. - Public Function: The
public fun hello()defines a public function namedhello. Public functions can be called from outside the module. - String Literal: The
b"Hello, Move!"line defines a local variablegreetingthat holds the string in a vector u8 format. - Return Statement: The function returns the vector u8 that represents the string “Hello, Move!”.
This simple module defines a function that returns a greeting string. While this example is basic, it serves as a starting point for understanding Move syntax and structure.
Deploying the Move Module
To deploy our Move module, we need to compile it and submit it to the Aptos blockchain. Here’s how to do it:
- Compile the Module:
move build- Deploy the Module:
move publish --package-dir <path_to_your_module>Replace <path_to_your_module> with the path to your Move module file.
- Compile the Module: This step involves transforming the human-readable Move code into bytecode that the Aptos blockchain can understand and execute.
- Deploy the Module: After compilation, the module is submitted to the blockchain. This involves creating a transaction that includes the bytecode and sending it to the network for validation and inclusion in a block.
Building a Simple Smart Contract
Let’s extend our example by building a simple smart contract that manages a counter. Create a new file named Counter.move and add the following code:
module 0x1::Counter {
    resource struct Counter {
        value: u64,
    }

    public fun initialize(): Counter {
        Counter { value: 0 }
    }

    public fun increment(counter: &mut Counter) {
        counter.value = counter.value + 1;
    }

    public fun get_value(counter: &Counter): u64 {
        counter.value
    }
}- Module Declaration: The
module 0x1::Counterdeclaration defines a new module namedCounterat address0x1. - Resource Declaration: The
resource struct Counterdefines a new resource namedCounterwith a single fieldvalueof typeu64. - Initialize Function: The
public fun initialize()function creates and returns a newCounterresource with an initial value of 0. - Increment Function: The
public fun increment(counter: &mut Counter)function takes a mutable reference to aCounterresource and increments its value by 1. - Get Value Function: The
public fun get_value(counter: &Counter): u64function takes an immutable reference to aCounterresource and returns its current value.
This smart contract defines a counter that can be incremented and queried. The use of references ensures that resources are managed correctly, preventing accidental duplication or loss.

Testing the Smart Contract
To test our smart contract, we can write some test cases using the Move CLI. Create a new file named Counter_test.move and add the following code:
module 0x1::CounterTest {
    use 0x1::Counter;

    public fun test_initialize() {
        let counter = Counter::initialize();
        assert!(Counter::get_value(&counter) == 0, 1);
    }

    public fun test_increment() {
        let counter = Counter::initialize();


        Counter::increment(&mut counter);
        assert!(Counter::get_value(&counter) == 1, 2);
    }
}- Module Declaration: The
module 0x1::CounterTestdeclaration defines a new module namedCounterTestat address0x1. - Use Statement: The
use 0x1::Counter;statement imports theCountermodule for use in our tests. - Test Initialize Function: The
public fun test_initialize()function tests theinitializefunction by asserting that the initial value of the counter is 0. This ensures that the counter starts at the correct value. - Test Increment Function: The
public fun test_increment()function tests theincrementfunction by asserting that the value of the counter is 1 after a single increment. This verifies that the increment function works correctly.
To run the tests, use the following command:
move test- Compiling the Tests: When you run
move test, the Move CLI compiles the test cases along with the module code. This ensures that both the tests and the module are up to date. - Running Assertions: The assertions in the test functions check whether the actual behavior of the code matches the expected behavior. If an assertion fails, it will provide an error message with the provided error code (e.g.,
1or2).
By testing our smart contracts, we ensure that they behave as expected and catch any errors before deploying to the blockchain.
Deploying and Interacting with the Smart Contract
Finally, let’s deploy our smart contract and interact with it on the Aptos blockchain. Follow the same steps as before to compile and publish the Counter.move module.
To interact with the deployed smart contract, you can use the Aptos CLI or write a script in your preferred programming language that interfaces with the Aptos blockchain.
Connecting to Wallets

To make transactions, we need to interact with wallets. A wallet is a tool that stores a secret key securely and lets the user sign transactions. Wallets come in many forms, most commonly browser extensions, and they give you (the developer) APIs to suggest transactions to the user.
Using the Aptos Wallet
Aptos provides an official wallet extension that can be used to interact with the blockchain. To get started:
- Install the Aptos Wallet Extension: Download and install the Aptos Wallet extension. You can use Petra or Pontem
- Create a New Wallet: Follow the prompts to create a new wallet and save your recovery phrase securely.
- Connect to the Aptos Network: Use the extension to connect to the Aptos network.
Interacting with the Wallet
You can use the Aptos Wallet API to suggest transactions to users. Here’s a basic example of connecting to the wallet and suggesting a transaction:
// Example JavaScript code to interact with Aptos Wallet
const connectWallet = async () => {
  if (window.aptos) {
    try {
      const response = await window.aptos.connect();
      console.log("Connected to wallet:", response);
    } catch (error) {
      console.error("Error connecting to wallet:", error);
    }
  } else {
    console.error("Aptos Wallet not found");
  }
};

const sendTransaction = async () => {
  if (window.aptos) {
    const transaction = {
      // Define your transaction details here
    };
    try {
      const response = await window.aptos.signAndSubmitTransaction(transaction);
      console.log("Transaction sent:", response);
    } catch (error) {
      console.error("Error sending transaction:", error);
    }
  }
};

// Call the connectWallet function when the user clicks a button
document.getElementById("connectWalletButton").addEventListener("click", connectWallet);
document.getElementById("sendTransactionButton").addEventListener("click", sendTransaction);
Reading Data from the Blockchain
Accounts on Aptos
Similar to Solana, Aptos uses accounts to store data and manage interactions with the blockchain. Accounts are central to the functionality of the Aptos blockchain and are used for storage, smart contracts, and native blockchain operations.
Each account has several fields:
- Balance: The amount of tokens held by the account.
- Owner: The owner of the account.
- Data: The data stored in the account.
- Rent Epoch: The epoch at which the account will owe rent.
Reading Account Data
To read data from an account, you can use the Aptos SDK. Here’s an example of how to get the balance of an account using JavaScript:
const getAccountBalance = async (address) => {
  try {
    const response = await fetch(`https://fullnode.devnet.aptos.dev/v1/accounts/${address}`);
    const data = await response.json();
    console.log("Account balance:", data.balance);
  } catch (error) {
    console.error("Error getting account balance:", error);
  }
};

// Example usage
const address = "your_account_address";
getAccountBalance(address);
Writing Data to the Blockchain
To write data to the blockchain, you need to submit transactions. Transactions are data write commands that can be accepted or rejected based on certain conditions.
To submit a transaction, you need a key pair (public and private keys). The private key is used to sign the transaction, proving ownership and authorization.
Example Transaction
Here’s an example of creating and sending a transaction using the Aptos SDK:
const sendTransaction = async (sender, recipient, amount) => {
  const transaction = {
    // Define the transaction details
    from: sender,
    to: recipient,
    amount: amount,
  };

  try {
    const response = await fetch("https://fullnode.devnet.aptos.dev/v1/transactions", {
      method: "POST",
      headers: { "Content-Type": "application/json" },
      body: JSON.stringify(transaction),
    });
    const result = await response.json();
    console.log("Transaction result:", result);
  } catch (error) {
    console.error("Error sending transaction:", error);
  }
};

// Example usage
const sender = "your_sender_address";
const recipient = "your_recipient_address";
const amount = 100;
sendTransaction(sender, recipient, amount);
Security Practices
When dealing with blockchain transactions, security is paramount. Here are some key practices to ensure security:
- Secure Key Management: Store your private keys securely and avoid exposing them in your code.
- Use Hardware Wallets: For significant holdings, consider using hardware wallets that offer superior protection against remote attacks.
- Stay Informed: Follow reputable security-focused resources to stay updated on the latest security practices and vulnerabilities.
Conclusion
You have successfully written, deployed, and tested your first Move smart contract on the Aptos blockchain. We covered the basics of setting up your development environment, writing a simple Move module, building a smart contract, and testing it. With this foundation, you can explore more advanced features of Move and Aptos to build powerful decentralized applications.
References
- Aptos Smart Contracts Documentation (https://aptos.dev/en/build/smart-contracts)
- Aptos Blockchain Overview (https://aptos.dev/en/network/blockchain)
- Aptos White Paper (https://aptos.dev/en/network/blockchain/aptos-white-paper)
- Aptos Labs Learn (https://learn.aptoslabs.com/)
- Rust Programming Language (https://www.rust-lang.org/)
- Move CLI GitHub Repository (https://github.com/aptos-labs/aptos-core)
- Move Language Documentation (https://move-language.github.io/move/)
- Aptos GitHub Repository (https://github.com/aptos-labs/aptos-core)
- Understanding Smart Contracts (https://ethereum.org/en/developers/docs/smart-contracts/)
- Blockchain Basics (https://www.ibm.com/blockchain/what-is-blockchain)
- Introduction to Aptos Blockchain (https://www.youtube.com/watch?v=IJ0Tm0jYN60)
- Aptos Move Programming Language Tutorial (https://www.youtube.com/watch?v=YekoFYYehxo)
- Building Smart Contracts with Move on Aptos (https://www.youtube.com/watch?v=Uxcx6xTJx6w)
- Deploying Smart Contracts on Aptos (https://www.youtube.com/watch?v=Z6kN01OJRM0)
Hello world and happy coding!